Upload Current Gamemaker Studio Project to Github
Source control is an essential part of game evolution and one that every programmer should utilize. Setting up a repository can be quite a hassle if y'all don't know what yous are doing. Fifty-fifty later information technology's set up, dealing with merge conflicts, branching, and pulling can exist daunting. In this 2 part weblog series, I will show you everything you need to work with source command, specifically in GameMaker Studio 2 (GMS2), including:
- Benefits of using source control and how to take advantage of it
- Types of source command
- Useful definitions when working with source control
- Setting up a repository
- Adding team members to repository
- Integration and first commit
- Pull, commit, merge, and push changes
Disclaimer about screenshots: I am using a custom skin in GMS2. The windows and colors may await dissimilar from yours, but the options are nevertheless.
What is source command?
Source control is a tool used to manage changes and versions in software development, hence why it is also referred to as "version control". When working with source control, team members submit their changes and compare them to the changes of others, somewhen merging information technology all together and ending up with a version of the software that includes all the latest information. Doing this by hand is very complicated and prone to error, which is why we accept computers assistance us with this process. Information technology is an essential tool when working with multiple people sharing a codebase, letting everyone piece of work at any time without interfering with anyone else'south work.
Benefits of using source command
- Project backup on a server: Whether you are using an online service, or your ain server, this will ensure that you will non lose your project if you experience hardware malfunction. Improve safe than sorry!
- Team collaboration: Using source control when multiple people are working on the same projection is invaluable. Everyone tin change any office of the project without the fear or deleting someone else's projection. Team Members will have access to the most up-to-appointment version of the program at all times.
- Finding the origin of a bug: Sometimes nosotros come up across bugs nosotros take no idea where to look for them. A good mode to narrow down the search for a bug is to revert to an older revision and test if the bug is present. You lot'll attain a version in which the issues is not at that place so, helping yous pinpoint when the bug was introduced. If y'all and your team are committing their changes frequently, you lot should have a small list of files inverse between the version with and without the bug. Information technology is likely that the bug has something to practise with the files that were changed in that commit, so at present yous take a smaller set of files to debug, as opposed to the entire project.
- Reverting to a "Last Skilful Known Build": You lot should always take a "Last Proficient Known Build" of your project. This is particularly important to do before events where you will show a DEMO of your game. Either considering you are working on some features which are not done yet, or you made last infinitesimal changes that ended up introducing bugs, there is nothing worse than trying to show off your project and running into a roadblock. If this happens, revert to your Last Good Known Build and show that one. After the result is over, you tin revert to the latest version and keep working, no problem.
Types of source control
In that location are dissimilar source control types, the near common being: Git, Mercurial (HG), Perforce, and SVN. These are subdivided into: distributed (Git and HG) and centralized (Perforce and SVN).
Centralized source controls are great for big projects because the repository storage is at a server. Information technology allows anybody to pull and button changes at volition. The downside is that they are slower rely on Internet speed.
Besides, yous demand to check out or lock files before working on them, to prevent other people from modifying the same file. Once more, these are nifty for larger projects, since yous don't need to go along a local copy of the repository.
For smaller projects though, the ones nosotros are interested in are the distributed source controls. For these, everyone keeps a local copy of the repository on their calculator. This allows members to work on any role of the project. One time they are done with their changes, they can commit and push it (more on these terms subsequently). However, you tin run into issues when trying to push or pull changes on the same file as someone else. We call these "merge conflicts" just in that location are ways to solve them, which we will discuss later.
In this series, we volition exist working with Git, since it is integrated with GameMaker Studio two by default. If you desire to use an external tool to work on your repository, Mercurial works likewise (I used Mercurial while working on INK and HackyZack).
Useful definitions when working with source command
A few concepts that will be used when working with repositories are:
- Commit: Think of this as creating a local "savepoint" for your project. You tin can revert to any of your commits (revisions) later on.
- Pull: This is when you take hold of the latest version of the repository from the server and compare information technology to your local ane, meaning your latest commit.
- Disharmonize: When two people change the same file, and at that place is no easy solution, the program marks information technology as a conflict. The developer needs to resolve all conflicts before moving forward.
- Merge: This is the process of fixing all your conflicts. It tin be done either by picking your local file, the 1 on the server, or a mix of both that includes all changes.
- Push: After you fix all the conflicts and merge the files, y'all send it back to the server by pushing information technology. This way, others can pull the changes subsequently.
Setting upwardly a repository
The two most mutual websites that allow you to prepare a repository are Github and Bitbucket. Github is the virtually popular for open-source projects, but it does not permit yous to create private repositories with a gratis account, and it only works with Git. Bitbucket allows you create unlimited private repositories using Git or Mercurial, for up to v members. If your team is larger than 5 members, this may be a slight trouble. Bitbucket's pricing model is still cheaper than Github'due south, and then it is however the ameliorate choice and the one I use in all my projects.
First, become to http://bitbucket.org and Sign Up or Log In, if you already have an account.
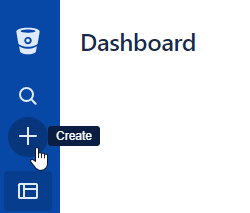
Once y'all log in and are on your Dashboard, the "Create" button:
From there, you can create a new Repository or a new team. Creating a squad is simple, and it is useful if you have many members. Let's go over the menu to create a repository.
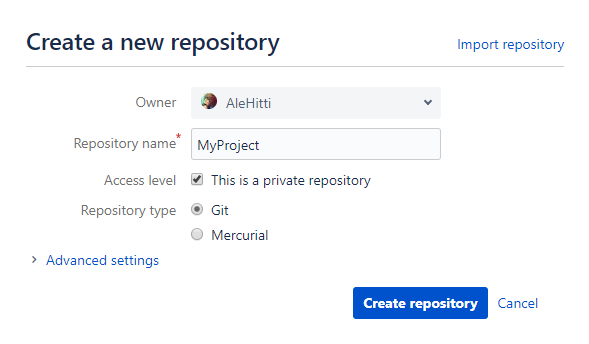
The possessor can be your own account, or y'all can choose a team as the owner. Hither, I'm making a personal repository, and then I'll choose my account. Next, pick a name for your repository. Make sure y'all select "This is a private repository" and "Git" as the type (Mercurial works too if you plan on using an external tool). Don't worry too much about the advanced settings for now. Afterwards, click on "Create Repository".
Adding team members to a repository
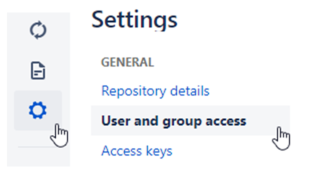
Another thing yous may want to practise if working with a team is to add users to your Repository. Everyone in your team start needs to create a Bitbucket account. Then, the administrator tin click on the Settings > User and group admission.
Type the username or e-mail accost of each team member and set their privileges to Write or Admin. This allows them to push changes. Y'all tin can besides add together them to a group, include that group, and set its admission level to Write/Admin. Either option works.

Now let's integrate the repository we created with GameMaker Studio ii.
Integration and first commit
Open up GameMaker Studio two. You don't need to open up whatever projects for now. Go to Files > Preferences. Next, you lot are going to click on Plugins > Source Control (Git).
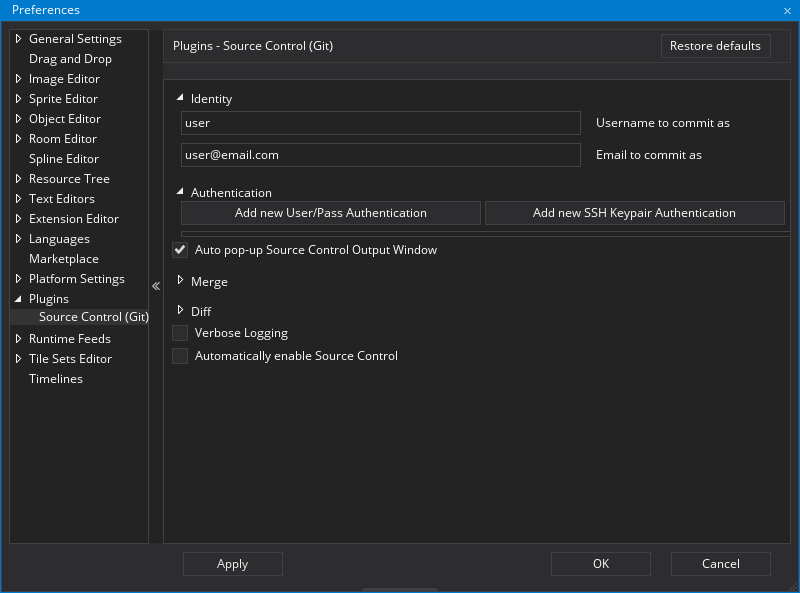
You should end up with a screen like this ane. Enter your Identity details. Choose a username that your team members will recognize. It doesn't accept to be the aforementioned i y'all used in Bitbucket/Github. The electronic mail is also irrelevant, but it'due south proficient practice to apply the same one every bit the one yous use in your account. Next, set your Authentication details by clicking on "Add together new User/Pass Authentication".
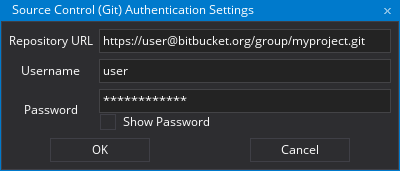
The Username and Countersign are the ones you use to log into the repository website. The Repository URL is in a box at the acme of your Overview page that says "SSH" and has a text box adjacent to it:
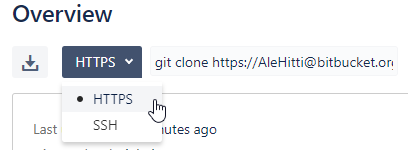
Switch it to HTTPS fashion and copy the link within. If the repository already has content in it, and then your URL will include the "git clone" part. Remove it. Your URL should be: https://username@host.com/grouping/repoName .
At this point, you lot are in one of two situations:
- You created the repository, but need to push the Initial Commit.
- The repository is already populated and you need to clone information technology on your computer.
I volition explicate what to do in both cases.
Instance 1: creating the initial commit
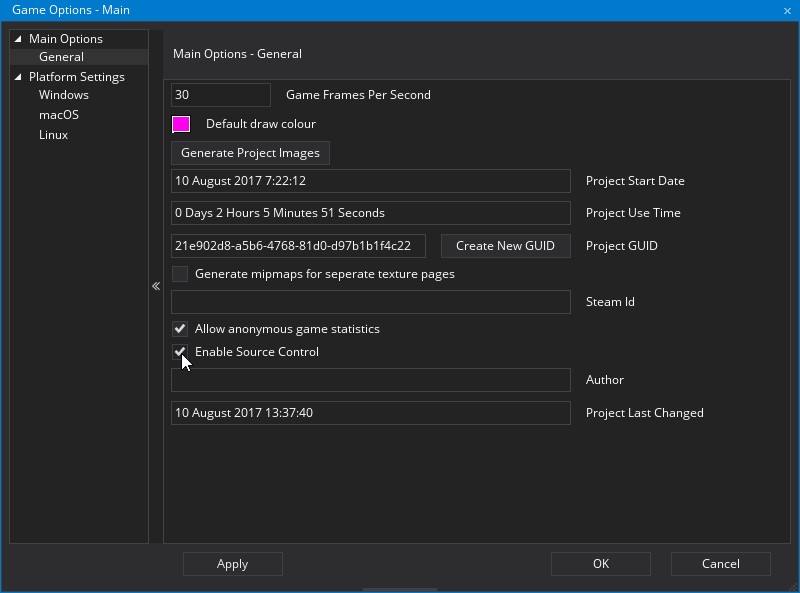
Open your project, or make a new one, if you are starting from scratch. Go to your Master Options under your Resources tab. In General > Settings, check the box that says "Enable Source Control".
This will set the source control panel visible on the tiptop bar which shows these options:
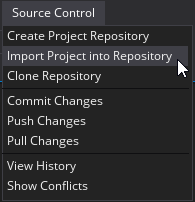
The first option creates a local Repository you can use. This is useful if you are working on a personal, solo project, and have a bad Net connection. A safer way is to take your repository backed upwards on a server, in case annihilation happens to your difficult drive. The second option, Import Project into Repository, is the one we volition employ. A prompt asking you to enter the Repository URL will testify when you click information technology. If your identity and authentication information is correct, GameMaker will create an initial commit and button it to the repository. Else, you lot will get this warning message:
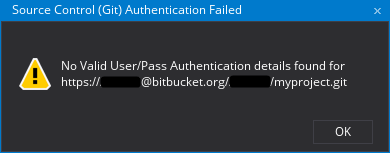
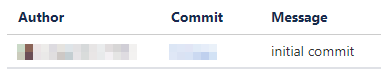
If this happens, become back to the previous footstep and attempt over again. When everything is working, become to your Bitbucket folio and click on Commits:

You should see something like this:
And you lot are done! Now, what happens when you want to gear up the repository for another team member or on another computer? This time, the process is simpler.
Example 2: cloning the repository
Open up GameMaker Studio two. On the welcome screen, get to Source Control > Clone Repository. You will get this dialog box:

Go to Bitbucket, copy the HTTPS link and put it in the top box. On the second 1, select a local folder to clone your project into. After you do this, information technology will clone the repository and it will ask yous to cull the YYP file for your project to open information technology. That'south all!
Pull, commit, merge, and button changes
Allow's explicate the standard workflow when using repositories. The most basic loop is:
Brand Changes --> Save --> Commit --> Pull --> Merge --> Commit Merge --> Push
The showtime iii are self-explanatory. Piece of work until you reach a good stopping bespeak. Then, save and commit your changes. I endeavour to commit once I finish working on an object or a feature. I recommend committing often so that each version's changes are easier to keep track of. At least, commit once a day. This manner, you volition ever accept your work backed upward and up to appointment. When yous are prepare to commit your build, save and become to Source Control > Commit Changes. You lot volition see a window that looks like this 1 when committing changes:
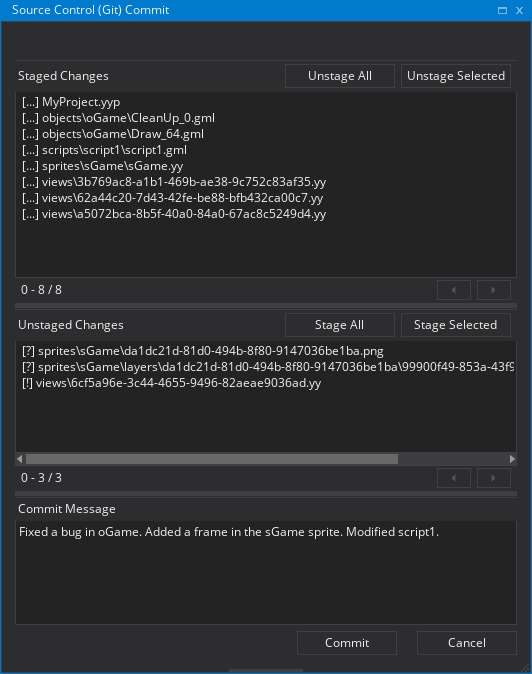
The window has three sections. Staged changes are the ones you want to commit. Unstaged ones are the files you lot changed, but may not desire to keep those changes. Usually, you will want to click on "Stage All" to make certain all the changes go through though. Last, you can add a Commit Message. This is optional, only I encourage you to add a detailed description. Information technology doesn't accept to be long. Detail what yous did since your terminal commit every bit this will make it easier to find a specific revision.
After you commit your local copy, the next thing you demand to exercise is Pull from the server. This will check for any un-synced changes. If there aren't any changes, y'all are gratuitous to skip the Merge and Commit Merge steps and Push button. Withal, if in that location are changes, a few different things can happen. The easiest scenario to fix is when in that location are no common changes. In this case, the program will apply the recent version of each file. Afterwards, commit again the new version with all the changes in information technology, and push information technology. The complications first when yous alter a file that has already been changed on the server, creating Merge Conflicts. When this happens, a window will popular up with all the alien files and iii options:
- Apply Theirs: This option replaces the local file with the one on the repository.
- Use Mine: Same as above, but y'all choice your local file as the one to keep, which volition replace the one on the repository.
- Merge: Selecting this option opens both files using your merge tool. Sometimes the solution is trivial, other times yous need to do a lot more than work. I can't explain how to solve every merge conflict state of affairs in this postal service, but I will go through a few in the side by side section.
After you resolve all the merge conflicts, you are free to commit and button.
TIP: When y'all pull, you lot may become a bulletin alerting you that some files changed, and ask you if yous want to reload them. This can get annoying. There's a setting in File > Preferences > Full general Settings chosen "Automatically reload inverse files". Turn it on if you desire to skip this dialog box in the future.
To be continued...
This concludes part one of the series. I hope you lot found it useful. In the next section, I volition get over the almost common merge conflicts and how to solve them (read part ii of this serial here).
I am always willing to help out if you run into any issues with the material covered in the commodity, or something else related to GMS2. Y'all can contact me by e-mail or on Twitter.

Alejandro Hitti is a videogame Programmer and Designer from Venezuela. Although his groundwork is in C++ and working using custom-made game engines, his two commercial games, INK and HackyZack, were made using GameMaker Studio 1.iv. With the release of GameMaker Studio 2, that became his engine of choice. The novelty of GMS2, paired with his knowledge of the previous version, ignited his involvement to create tutorials that focus on this new engine.
vickersduchou1963.blogspot.com
Source: https://developer.amazon.com/blogs/appstore/post/d7cfe367-188e-4c89-98b2-1cdeef0c34ab/git-started-with-source-control-and-gamemaker-studio-2-part-1
0 Response to "Upload Current Gamemaker Studio Project to Github"
Post a Comment